

Dataset Save Menu
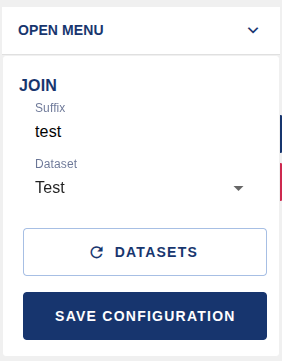
The Dataset Save Menu widget offers a dropdown interface for configuring the training parameters of several image sources at once. It lets you select the dataset, define a suffix and dynamically manage the number of sources, with real-time data syncing.
Each source has its own fields for the suffix and the dataset selection. Source names are automatically converted to lowercase and the folder path is built from the images path setting. The menu can optionally be wrapped in an expansion panel to organise the interface better.
Features
- Dynamic source management: configurable number of image sources with custom names.
- Dropdown interface: sliding menu with an optional expansion panel.
- Dataset management: the dataset options are populated dynamically from the input data.
- Configuration persistence: automatic restoration of the form state from the input data.
- Training and log modes: support for the training (
training) and log (log) configuration modes. - Professional styling: custom colour scheme with hover effects and visual feedback.
Configuration
| Property | Description | Default |
|---|---|---|
group | Dashboard group where the widget is displayed (required). | — |
name | Node name shown in the editor. | '' |
order | Widget order within the group. | 0 |
width | Widget width (0 = fit automatically to the group). | 0 |
height | Widget height (0 = fit automatically). | 0 |
confirmButtonText | Customisable text of the confirm/save button. | CONFIRM |
sourceNames | Array with the name of each image source (converted to lowercase). Required. | [] |
useExpansionPanel | Wraps the interface in an expansion panel to organise it better. | true |
imagesPath | Base path for image storage: training or log. | training |
Input
The node has 1 input. The following msg properties can be sent:
msg.options (array): options used to populate the dataset selection fields. Each element has label (displayed name) and value (value stored when selected).
msg.options = [
    { label: "TestUpload", value: "rp-class-testupload" },
    { label: "Training Set 1", value: "train_dataset_1" }
];msg.payload.configTraining (array): initialises the form in training mode (when imagesPath = "training"). Each object contains sourceName, suffix and dataset.
msg.payload = {
    configTraining: [
        {
            sourceName: "camera1",
            suffix: "_defect",
            dataset: "train_dataset_1"
        }
    ]
};msg.payload.configLog (array): initialises the form in log mode (when imagesPath = "log").
msg.payload = {
    configLog: [
        {
            sourceName: "camera1",
            suffix: "_log",
            dataset: "log_dataset_1"
        }
    ]
};Output
The node has 1 output. It emits a message depending on the user action:
Refresh datasets: when the dataset refresh button is pressed.
msg.payload = "refreshDatasets";Training configuration: when the confirm button is pressed in training mode. Each source includes the name in lowercase, the suffix (null if empty), the dataset (null if empty) and the full folder path.
msg.payload = {
    configTraining: [
        {
            sourceName: "camera1",
            suffix: "_defect",
            dataset: "train_dataset_1",
            folder: "opt/storage/images/training"
        }
    ]
};Log configuration: when the confirm button is pressed in log mode.
msg.payload = {
    configLog: [
        {
            sourceName: "camera1",
            suffix: "_log",
            dataset: "log_dataset_1",
            folder: "opt/storage/images/log"
        }
    ]
};Usage example
Basic configuration in three steps: first the available dataset options are sent, then (optionally) the form is initialised with a starting configuration and, finally, the user adjusts the values and presses confirm to obtain the complete configuration.
Step 1. Send the available dataset options:
msg.options = [
    { label: "Training Set 1", value: "train_1" },
    { label: "Training Set 2", value: "train_2" }
];
return msg;Step 2 (optional). Initialise the form with a starting configuration:
msg.payload = {
    configTraining: [
        {
            sourceName: "camera1",
            suffix: "_defect",
            dataset: "train_1"
        }
    ]
};
return msg;Step 3. The user adjusts the values and presses confirm. The node then emits msg.payload.configTraining with the complete configuration, including the folder path.
To configure several sources at once, send several objects in the configTraining array, one per camera or image source:
msg.payload = {
    configTraining: [
        { sourceName: "camera1", suffix: "_defect",  dataset: "train_dataset_1" },
        { sourceName: "camera2", suffix: "_anomaly", dataset: "val_dataset" },
        { sourceName: "camera3", suffix: "",         dataset: null }
    ]
};
return msg;